
 Nofil Khan
If you are tired of struggling against opponents who rely on AI defending while controlling only their CDMs, this 4-3-3(4) setup is your answer. This is a hyper-aggressive, high-risk system designed to flood the attacking third with bodies. You will always have a passing option going forward, but be warned: your midfield is often empty in transition. If you lose the ball cheaply, you will get countered. This is not for holding a 1-0 lead; it is for blowing the doors off a low block.
EA FC 26 Tactics Code for 4-3-3(4) Attack
Copy this code directly into your team management to import the setup instantly.
Tactics Code: &QN&VeFK?Qg1
- Build Up Style: Balanced
- Defensive Approach: Balanced
- Line Height: 60
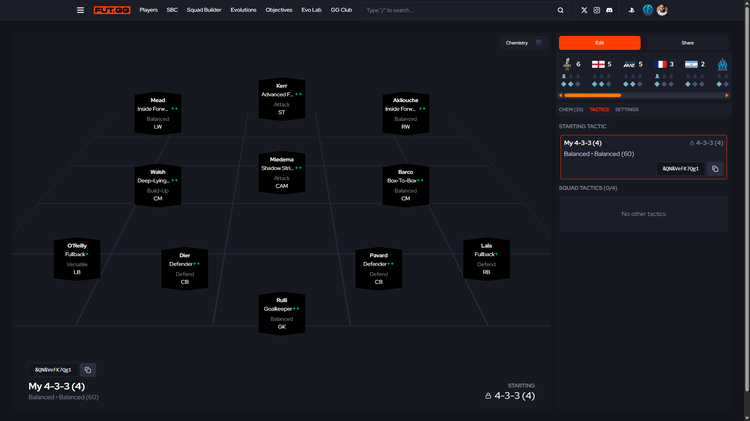
Player Roles and Instructions
This formation relies on specific movements to create overloads. The Shadow Striker CAM and Deep-Lying Playmaker LCM are the engines that make this work.
| Position | Role | Focus | Why This Works |
|---|---|---|---|
| ST | Advanced Forward | Attack | Pushes defensive line back to create space for CAM. |
| LW/RW | Inside Forward | Balanced | Cut inside for Finesse Shot angles or driven passes across box. |
| CAM | Shadow Striker | Attack | Most important player. Links midfield, runs beyond ST. |
| LCM | Deep-Lying Playmaker | Build-Up | Safety valve. Recycles possession, launches Incisive Passes. |
| RCM | Box-to-Box | Balanced | Extra body in box, must have stamina to recover. |
| LB | Fullback | Versatile | Supports midfield but stays back for reset. |
| RB | Fullback | Defend | Forms back-three during attack. |
| CBs | Defender | Defend | Standard meta setup. |
| GK | Goalkeeper | Defend | Reliable shot-stopping focus. |
How do you attack with this 4-3-3(4)?
The primary strength of this tactic is diagonal shifting. Because you have width from the wingers and verticality from the CAM and ST, you can stretch the opponent's defense simply by moving the ball side-to-side.
The Overload
Flood the box. Your ST, Wingers, CAM, and RCM will all push forward. This overwhelms players who rely on AI auto-blocks.
The Reset
If the path forward is blocked, do not force it. Your LB (Fullback Versatile) and LCM (Deep-Lying Playmaker) will be sitting in deep pockets. Use them to reset, switch the play diagonally, and attack the weak side.
Breaking the Press
Against high-pressure opponents, the diagonal switch from your defensive Fullback to the opposite Winger is often open because the opponent's midfield is sucked into the center.
What are the main risks with this formation?
This is a "Glass Cannon" build. The main risk occurs when you lose the ball in the attacking third, particularly on the Right Wing.
Because your RCM (Box-to-Box) pushes high, if you turn the ball over on the right side, your midfield is essentially empty. Your LCM has to cover too much ground, leaving your backline exposed.
The Fix: If you are leading late in the game, switch to a more conservative formation like the 4-2-3-1 or 4-4-2. Do not use this tactic to close out tight games against elite opposition.
Which PlayStyles are essential for this setup?
Since this tactic relies on rapid passing and specific movement, you need players who fit the roles perfectly.
- Incisive Pass: Essential for your LCM and CAM. You need to slip the ball through tight gaps when the opponent's low block shifts.
- Finesse Shot: A priority for your Wingers. Since they cut inside as Inside Forwards, the far-post finesse is your primary scoring route against packed boxes.
- Low Driven: Crucial for your Striker. You will often find yourself in 1v1 situations or receiving cutbacks; the Low Driven shot is the most consistent finisher inside the box this year.
- Anticipate: Your CBs need this to win 1v1s, as they will often be isolated without CDM support.
How do you defend without a CDM?
This is the hardest part of the formation. You do not have a dedicated CDM holding hand.
Manual Screening
You must manually control your RCM and LCM to screen the edge of the box. They are your first line of defense against Finesse Shots.
Don't Touch the CBs
Do not step up with your Center Backs unless you are 100% sure you will win the ball. If you miss a tackle with a CB, there is no one behind to cover you.
Bait the Press
Against deep defenses, use player movement to bait them into pressing you, then trigger the diagonal through ball into the space they leave behind.
Who This Tactic Actually Crushes (And Struggles Against)
This hyper-aggressive 4-3-3(4) dominates opponents who rely on AI defending while manually controlling only their CDMs. The constant movement of your Shadow Striker CAM, advancing RCM, and cutting Inside Forwards creates too many dynamic runs for passive AI defenders to track—your diagonal overloads will rip them apart.
It struggles against narrow, midfield-dominant formations like 4-1-2-1-2 Narrow or 4-3-2-1 because your advancing CMs leave the central areas exposed. Skilled players who ping-pong through the middle will exploit your empty midfield on transitions, especially after failed right-wing resets.
Quick Fix: Against narrow opponents, manually drop your RCM into cover duty and use your LCM's Incisive Pass+ to switch wide faster. Still risky, but playable if you defend proactively.
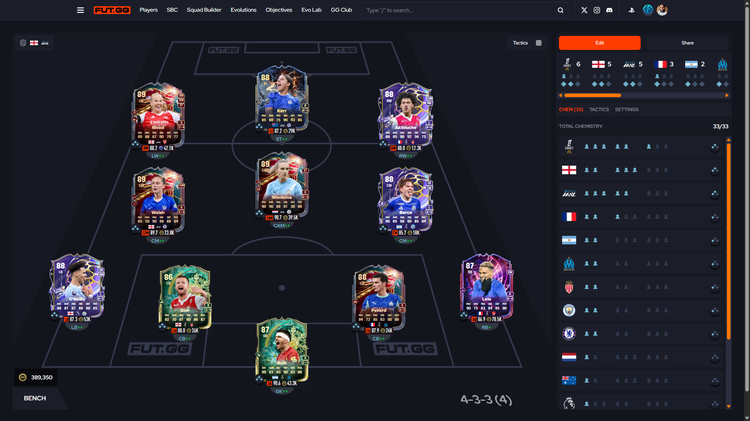
Here is a squad that will work perfectly for this 4-3-3 Attacking setup.
Have you tried this aggressive 4-3-3(4)? Build your squad using our Squad Builder and let us know how it performed for you!